How to Use Margins and Overlap for Tiled Printing
This guide is for anyone printing images across multiple pages and struggling with cutting and alignment. PrintTiler's margin setting keeps important content away from paper edges that a printer may crop, while overlap adds duplicate content at page boundaries for safer trimming and easier alignment. This guide builds on our techniques for assembling tiled prints with perfect alignment. If content is already disappearing at the outside of a sheet, start with our printer edge-cropping troubleshooting guide.
Direct answer
Should tiled pages overlap by 5 mm?
Yes, 5 mm is a practical starting point when neighboring tiled pages need shared image content for trimming and alignment. Margin protects content at the outside of each sheet, crop marks provide optional trim references, and recognizable alignment landmarks inside the repeated image help you match the seam.
Best for
- Printers with non-printable edges or borderless overscan
- Multi-page posters where trimming and alignment accuracy matter
Not for
- Single-page prints with no assembly step
- Jobs where printer-edge clipping and page assembly are not concerns
Works on
- The PrintTiler margin control
- Off, 3 mm, 5 mm, and 10 mm overlap settings
Why PrintTiler instead
- Protects edge content from printer cropping
- Reduces visible seams and gives you tolerance for trimming errors
Margins and overlap only pay off if every tile is correct, so check each page in the preview before printing the full job. The multi-page poster printing guide shows the complete preview-and-print workflow for A4 and Letter sheets.
In This Guide
- What is Overlap?
- Margins vs. Overlap
- Prevent Borderless Printing Crop
- Reduce Printer Feed and Paper Loading Errors
- Why Use Overlap?
- When to Use 5 mm Page Overlap
- Use Recommended in PrintTiler 1.11
- Overlap Presets and Custom Values
- How Overlap Works
- Overlap, Crop Marks, Trim Lines, and Alignment Landmarks
- Assembling with Overlap
- Recommended Settings
- Assembly Checklist
What is Overlap?
When you print a large image across multiple pages, each page contains a portion of your image. Without overlap, the pages meet exactly edge-to-edge — any small misalignment during assembly creates visible gaps or mismatched lines.
Overlap solves this by extending each page slightly into the adjacent page's territory. The result: neighboring pages share a small strip of identical content. When you assemble the poster, you can overlay one page on top of the other at this shared zone, ensuring perfect alignment even if your cuts aren't pixel-perfect.
Think of It Like This
Imagine two puzzle pieces that don't just touch at the edges, but actually overlap slightly. You can slide them around to find the perfect fit because you have room to adjust. That's exactly what overlap does for your printed pages.
Margins vs. Overlap: What Each Setting Does
Margins and overlap solve different printing problems. A margin protects content at the paper edge; overlap protects content where neighboring tiles meet. One setting does not replace the other.
Margin
Printer-edge protection
A margin moves the tiled image away from the edge of each sheet. Use it when your printer has a non-printable area or when borderless mode enlarges and crops the page.
Start with: 5mm. Increase it if a test print still clips important content.
Overlap
Seam and assembly protection
Overlap repeats a strip of image content on neighboring tiles. Use it when you will trim, align, and join multiple sheets into one larger print.
Start with: 5mm for normal office paper and hand assembly.
Margin + Overlap
Safest general setup
Use both when a home printer may crop page edges and the finished print will be assembled from several sheets. Margin protects the sheet edges; overlap preserves shared content at the seams.
Start with: Auto Margin and 5mm overlap, then verify with one test page.
How to Prevent Cropping with Borderless Printing
Borderless printing usually works by slightly enlarging the page so ink extends beyond the paper edge. That intentional overscan can remove outer pixels, crop labels or registration details, and make tiled seams harder to align. PrintTiler cannot change the printer driver's overscan, but margins and overlap give the print enough safety area to tolerate it.
For Exact Size, Prefer the Standard Paper Option
If edge-to-edge ink is not required, choose the normal A4, Letter, or other paper option instead of its borderless variant. Match the paper size in PrintTiler and the macOS print dialog, and avoid applying a second "Scale to Fit" after PrintTiler has prepared the pages.
Add a Safety Margin
Set Margin to Auto so the layout uses your printer's reported safe area. If Auto is unavailable, start with 5mm. Check that text, lines, faces, and other important details do not touch a paper edge.
Add Overlap for Multi-page Assembly
Set Overlap to 5mm when pages will be trimmed and joined. The repeated content gives you room to align neighboring sheets even when a printer trims or shifts the image slightly.
Match the Print Dialog
Select the same paper size and orientation in macOS. Use 100% or Actual Size when available, and disable any extra scaling option that would resize the already tiled pages.
Print Two Neighboring Test Pages
Choose two adjacent tiles, including an outer corner when possible, and assemble one seam. If the outer edge is clipped, increase Margin. If the shared strip does not leave enough room to compensate for trimming or slight paper-feed variation, increase Overlap.
Print the Full Set
Once the test page is correct, print the remaining pages without changing paper, scale, margin, or overlap settings so every tile uses the same geometry.
How to Reduce Printer Feed and Paper Loading Errors
Home printers do not always feed every sheet through exactly the same path. Curled paper, a stack loaded at an angle, paper guides that are too loose or too tight, and inconsistent rollers can shift or rotate the image slightly from one tile to the next. PrintTiler cannot control that mechanical movement, but a careful paper setup and enough overlap make small differences easier to handle during assembly.
- Square the stack: tap sheets against a flat surface and remove curled, damp, or damaged paper.
- Use one paper batch: keep the paper type, thickness, printable side, and loading orientation consistent.
- Set the paper guides: place them snugly against the sheet edges without bending or pinching the paper.
- Match every setting: use the same paper size and orientation in PrintTiler, macOS, and the printer tray.
- Keep the geometry fixed: print at 100% or Actual Size and disable Scale to Fit and borderless printing.
- Test one real seam: print and assemble two neighboring pages before committing the full stack.
Overlap Adds Tolerance; It Does Not Calibrate the Printer
Start with 5mm overlap so neighboring pages share enough image content to slide into alignment. Try 10mm when a successful test shows that you need more assembly room. If sheets are noticeably angled or move by a different amount on every pass, reload the paper, clean the feed rollers, or run the printer manufacturer's paper-feed maintenance before printing the full job. Overlap cannot correct scaling, rotation, or a mechanical feed fault.
Why Use Overlap?
Overlap provides several practical benefits when assembling multi-page prints:
Prevents White Gaps
Even with careful cutting, tiny white lines can appear at seams. Overlap helps prevent this by giving you extra image content to cover any gaps.
Easier Alignment
With duplicate content on both pages, you can visually match the image elements (lines, colors, text) to achieve perfect alignment before taping.
Forgives Cutting Errors
If your trimming isn't perfectly straight or you cut slightly off the line, the overlap zone gives you margin to work with.
Hides Seams
When one page overlaps another, the seam becomes less visible than a butt joint where edges simply meet.
When to Use 5 mm Page Overlap
A 5 mm page overlap is a practical starting point for most posters printed on ordinary A4 or Letter paper. It gives you enough repeated image content to trim by hand, compare details on neighboring sheets, and hide small cutting or feeding errors without using much extra ink.
Start at 5 mm, Then Test One Seam
Print two neighboring pages and assemble one seam before printing the full job. Reduce overlap to 3 mm when using a precise paper trimmer, or increase it to 10 mm when a test shows you need more room for slight feed variation, imprecise hand cutting, or a seam with few visual landmarks.
Use Recommended in PrintTiler 1.11
PrintTiler starts multi-page jobs with 5 mm overlap. If you deliberately switch Overlap to Off, the app shows a non-blocking recommendation because edge-to-edge tiles leave no shared image content for trimming or small paper-feed differences.
What Use Recommended Changes
- Uses Auto Margin when live or cached printer-safe values are available, otherwise a 5 mm fallback
- Restores 5 mm overlap between neighboring sheets
- Turns on crop marks as a trimming reference
The recommendation does not lock the controls. You can adjust each setting afterward, and you should still print two neighboring pages before committing the full job.
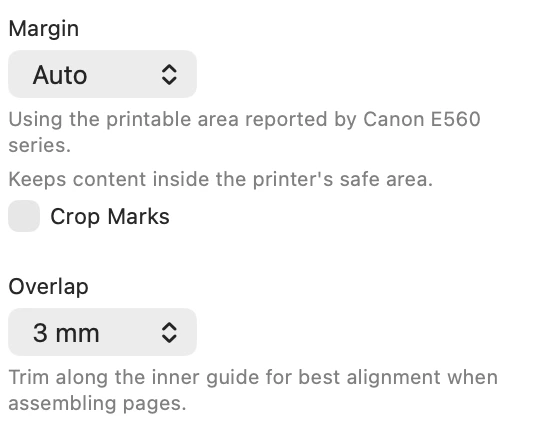
Set margin, crop marks, and overlap in PrintTiler
Overlap Presets and Custom Values
PrintTiler offers four quick presets plus a custom value. The right choice depends on your paper type, cutting precision, and how visible you want seams to be.
Off
0 mm
No overlap. Pages meet exactly edge-to-edge. Best for precise cutting with a paper trimmer and when you want the cleanest possible butt joints.
Use when: You have a precision paper trimmer and plan to use butt joints.
Small
3 mm (0.12")
Minimal overlap. Provides a small safety margin without noticeably increasing page content. Good for thin paper where thick overlaps might show through.
Use when: Using thin paper or when you want minimal visible overlap ridge.
Medium (Default)
5 mm (0.20")
Balanced overlap that works well for most situations. Provides enough margin for alignment while keeping the overlap zone manageable.
Use when: General-purpose poster printing with standard paper.
Large
10 mm (0.39")
Maximum overlap. Gives you the most flexibility during assembly but creates a wider overlap zone. Best when precision cutting isn't possible.
Use when: Cutting by hand with scissors, or for large posters viewed from a distance.
Custom
Metric or imperial input
Enter a specific overlap when a tested production workflow needs a value between or beyond the presets. PrintTiler validates the value against the usable paper area.
Use when: A measured trim process or project specification calls for an exact seam width.
How Overlap Works in PrintTiler
When you enable overlap, PrintTiler extends each tile's crop area into the adjacent tile:
- Right edge: Non-rightmost tiles extend into the tile to their right
- Bottom edge: Non-bottom tiles extend into the tile below them
- Corner tiles: Extend in both directions (right and down)
- Edge tiles: Only extend in applicable directions
Preview Visualization
In PrintTiler's preview, overlap zones are highlighted with a semi-transparent orange color. These orange strips show exactly where duplicate content appears. The content in the orange zone on one page is identical to the adjacent edge of the neighboring page.
What Gets Printed
With overlap enabled, each printed page is slightly larger in content (though the paper size stays the same). The image is scaled down very slightly to fit the additional overlap content onto the page. This scaling is minimal and typically imperceptible.
Without Overlap (Off)
┌─────────────┐┌─────────────┐
│             ││             │
│   Page A    ││   Page B    │
│             ││             │
└─────────────┘└─────────────┘
              ↑
         Exact seam
    (must align perfectly)
Pages A and B each contain unique content. Any cutting or alignment error creates a visible gap or mismatch.
With Overlap (5mm)
┌─────────────┬───┐
│             │░░░│← 5mm overlap zone
│   Page A    │░░░│  (duplicate content)
│             │░░░│
└─────────────┴───┘
          ┌─────────────┐
          │             │
          │   Page B    │
          │             │
          └─────────────┘
Page A's right edge contains 5mm of content that also appears on Page B's left edge. When assembling, place Page A over Page B — the duplicate content ensures alignment even if your cut isn't perfect.
Overlap, Crop Marks, Trim Lines, and Alignment Landmarks
These terms describe three different aids. Overlap is real image content repeated on neighboring pages. Crop Marks are optional printed marks that indicate where a page can be trimmed. Alignment landmarks are recognizable details already inside the image, such as a line, letter, corner, or color boundary that you can match across the repeated area.
Overlap
Repeated image content
Provides the shared strip used to layer and visually align neighboring pages. It affects the tiled layout itself.
Crop Marks
Optional trim reference
Turn Crop Marks on when a printed cutting reference will help. The marks do not replace overlap and do not protect content from a printer's non-printable edge.
Alignment Landmarks
Details inside the artwork
Use lines, text, and distinctive shapes inside the overlap to make the final visual adjustment before taping or gluing the seam.
Assembling Pages with Overlap
The assembly technique changes slightly when using overlap:
Arrange Pages
Lay out all pages in order. With overlap, the left and top pages will go "on top of" their right and bottom neighbors at the seams.
Trim the Underlying Page
For the page that goes underneath (right or bottom page), trim off the white margin on the edge that will be overlapped. The overlapping page will cover this edge.
Align Using Visual Markers
Place the overlapping page on top and slide it until the image content matches perfectly. Look for lines, text, or distinctive features that should align.
Secure the Overlap
Once aligned, apply adhesive. Double-sided tape works well for overlap assembly. Apply tape to the back of the overlapping section, then press firmly.
Pro Tip: Work in Rows
For large posters, first assemble all pages in each row (horizontal strips), then join the rows together vertically. This is easier than trying to align everything at once.
Recommended Settings by Situation
Home Inkjet Printer + Office Paper
Auto margin · 5mm overlap
A balanced setup that protects content from common printer edge limits and gives enough shared image area for hand assembly.
Thick Paper / Glossy Photo Paper
Auto margin · 3mm overlap or Off
Keep a safety margin for printer edges, but use less overlap because thick paper can create a visible ridge at layered seams.
Cutting with Scissors (Hand Cutting)
Auto margin · 10mm overlap
A large overlap gives more room to adjust alignment despite imperfect hand cuts, while the margin protects outer page content.
Minor Paper-feed Variation
Auto margin · Test 5-10mm overlap
Reload and square the paper first. Use the smallest overlap that lets two neighboring test pages align; repair severe or random feed errors before the full job.
Craft Knife / Paper Trimmer / Guillotine
Auto margin · 3mm overlap or Off
Precision tools enable accurate butt joints. Keep enough margin for the printer, then use minimal overlap if desired.
Maps, Blueprints & Technical Drawings
Auto margin · 5mm overlap
Fine lines and labels make both clipping and misalignment visible. This setup protects edge details and repeats seam content. Use the blueprint printing workflow to preserve the source PDF size and verify a known measurement before printing the full set.
Borderless / Full-bleed Printing
5-10mm margin · 5mm overlap
Borderless drivers may overscan and crop. Increase the margin after a test print; keep overlap for reliable tiled seams.
Quick Reference: Margin and Overlap Checklist
- Paper size and orientation match between PrintTiler and the print dialog
- Paper is flat, squared in the tray, and held correctly by the guides
- Borderless printing enabled only when edge-to-edge ink is required
- Margin set to protect important content from printer-edge clipping
- Overlap chosen based on paper type and cutting method
- Orange overlap zones visible in preview
- Outer page details remain inside the margin in preview
- Two neighboring pages assembled as a seam test before the full run
- All pages printed in one batch
- Pages laid out in correct grid order
- Underlying page margins trimmed at overlap edges
- Overlapping pages aligned using visual markers
- Double-sided tape or adhesive applied
- Seams pressed firmly and checked for alignment
Common Questions
Do margin and overlap do the same thing?
No. Margin keeps content away from the physical edge of each sheet. Overlap repeats content between neighboring tiles. Use margin for printer clipping, overlap for trimming and alignment, and both when you need protection from both problems.
Why does borderless printing cut off part of my image?
Most borderless printer drivers enlarge the page slightly so ink reaches past the paper edge. Add a margin in PrintTiler to keep important content inside the safe area. For a tiled print, also enable overlap so seam content is repeated. If clipping continues, increase the margin or turn off borderless printing.
Can overlap fix printer feed errors?
Overlap gives you shared image content so you can compensate for a small shift while assembling two pages. It cannot correct a page printed at the wrong scale, a noticeably rotated sheet, or a severe and random mechanical feed problem. Correct the paper loading or printer maintenance issue first, then choose overlap from a successful two-page test.
Does overlap make my image smaller?
Very slightly. With overlap, each tile contains a bit more image content, so the image is scaled down minimally to fit. At 5mm overlap on A4 paper, this is about 2% — typically unnoticeable.
Can I use overlap with any fit mode?
Yes. Overlap works with No Scale, Fit Width, Fit Height, and Custom Fit modes. It works with both Custom Fit options: Pages and Print Size. The overlap amount is included when PrintTiler calculates the final page grid and effective tile step.
What do the orange highlights in the preview mean?
The orange zones show where overlap occurs. Content in these zones appears on two adjacent pages. When you place one page over the other at these zones, the images will match.
Should I always use overlap?
Not necessarily. If you have a precision paper trimmer and want the cleanest possible seams with butt joints, turning overlap off gives you exact edge-to-edge tiles. Most users benefit from at least 3-5mm overlap for easier assembly.
How does overlap interact with the assemble technique?
With overlap, you'll use the "overlap joint" technique rather than "butt joint." See our assembly guide for detailed instructions on both methods.
Ready to Print?
For a complete walkthrough from printing to final assembly, see ourguide to printing a picture across multiple pages.