Why Is My Printer Cutting Off the Edges?
If part of an image disappears at the edge of a sheet, the source file is not necessarily damaged. The usual cause is a mismatch between the page layout and the area your printer can physically print. Borderless overscan, the wrong paper setting, and a second scaling step can produce similar symptoms.
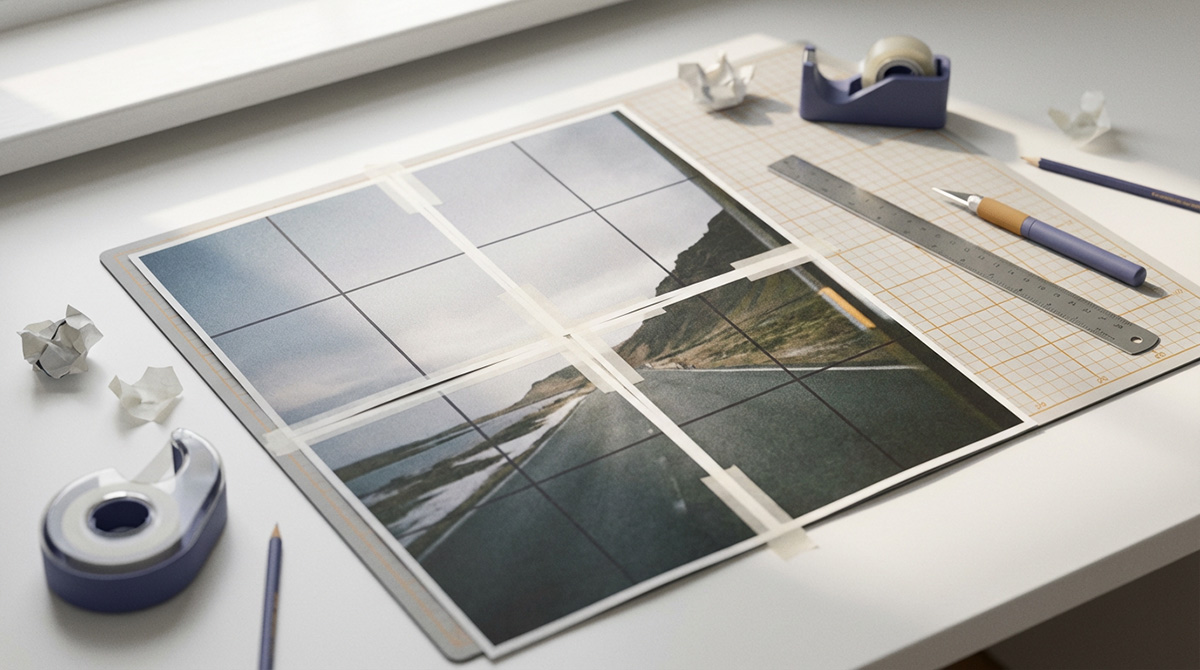
Direct answer
Use Margin for clipped edges. Use Overlap for seams.
Most printers cannot print to the physical edge of the paper. Set Margin to Auto so PrintTiler uses the safe print area reported by your selected printer. If that information is unavailable, start with 5 mm on every side. For tiled posters, set overlap separately so neighboring pages share content for trimming and alignment.
Best for
- Images, posters, PDFs, and diagrams losing content at a sheet edge
- Tiled prints with missing outer edges or misaligned internal seams
Not for
- Fixing a source file that is already cropped before it reaches PrintTiler
- Guaranteeing edge-to-edge output when a borderless printer driver applies overscan
Works on
- Auto Margin based on the selected printer and paper
- Manual, per-edge margins and separate overlap controls
Why PrintTiler instead
- Warns when the selected margin is smaller than the printer's reported safe area
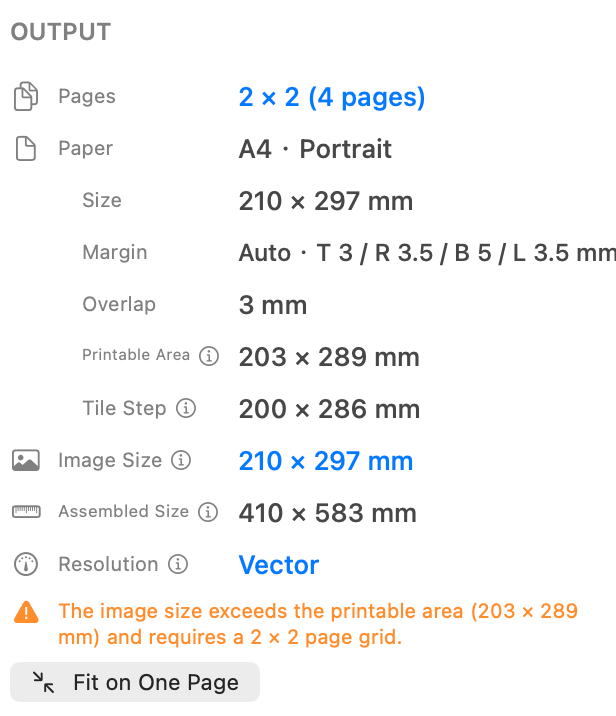
- Shows the page count, print size, margin, overlap, and resolution before printing
In This Guide
Why Print Edges Get Cut Off
A printer may accept an A4 or Letter page while still being unable to place ink across the entire sheet. Rollers and print-head mechanics leave a non-printable area, and its size can differ on the top, right, bottom, and left edges. Content that falls inside that area is sent to the printer but never appears on paper.
These are the most common causes of missing print edges:
- Margin is Off or too small: important content extends beyond the printer's safe area.
- Borderless overscan: the driver enlarges the page and intentionally crops the perimeter.
- Paper mismatch: PrintTiler is set to A4 while the macOS print dialog or printer uses Letter, or vice versa.
- Orientation mismatch: one part of the workflow uses Portrait while another uses Landscape.
- Double scaling: a driver option such as Scale to Fit resizes pages that PrintTiler has already tiled.
- Paper-feed skew: curled or unevenly loaded sheets rotate or shift while moving through the printer.
Match the Symptom to the Cause
Paper Feed and Loading Errors Affect Seams Differently
Margin and print-dialog settings control the intended page geometry. They cannot control the physical path of a sheet through a home printer. Before blaming the tiled layout, square and flatten paper from the same batch, load it in the correct orientation, and place the tray guides against the edges without bending the sheets. Avoid mixing paper types or using curled, damp, or damaged sheets in the same job.
Use Overlap for Small Adjustments, Not Mechanical Repair
Start with 5 mm overlap and assemble two neighboring test pages. The shared image strip lets you slide one page slightly while matching lines or text. Try 10 mm only when the printer is feeding consistently and you need more assembly room. If pages are severely angled or shift by a different amount on every pass, reload the paper, clean the feed rollers, or run the manufacturer's paper-feed maintenance before continuing.
How Auto Margin Prevents Clipping
In the latest PrintTiler for Mac, Auto Margin reads the printable area reported for the selected printer and paper. The layout stays inside that safe area before the pages are sliced. Because printer limits can be different on each side, Auto is more precise than assuming one universal margin.
Live, Cached, and Fallback Safe Areas
When the selected printer is ready, PrintTiler uses its current printable area. If that printer later goes offline, the app keeps the last successful values for the same paper and orientation. With no matching cached value, it uses 5 mm on each edge so the layout can still be prepared without claiming device-specific accuracy.
Choosing Custom Margin for the first time starts from the current Auto values, including different values for the top, right, bottom, and left edges.
Fix cropped tiled prints with PrintTiler
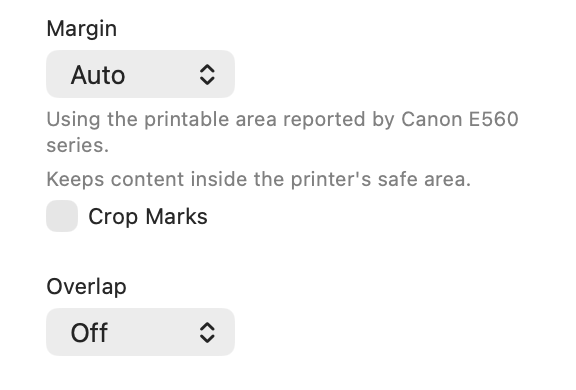
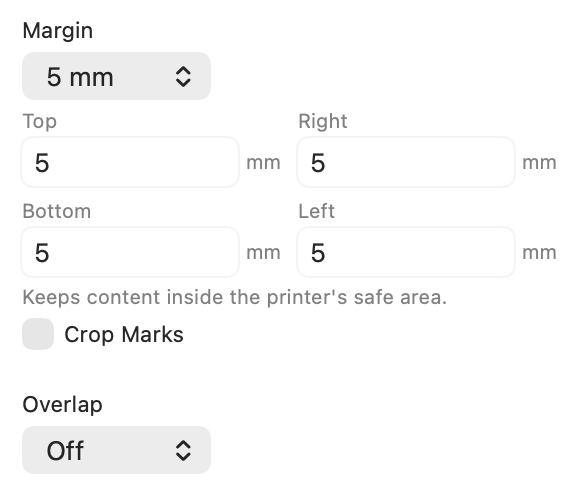
When Auto Is Unavailable
Some printer drivers do not report a reliable printable area for every paper option. In that case, use 5 mm on all four sides as a starting point. Print one page with an outer edge and increase the affected side if any content is still missing.
When the Paper Is Large Enough but the Printable Area Is Not
PrintTiler 1.11.0 distinguishes the physical sheet from the smaller area the printer can actually reach. If content fits the sheet but crosses that printable area, the app explains why another page is required. Choose Fit on One Page to reduce the content into the safe area, or useRestore Previous Size when exact dimensions matter more than keeping the job to one sheet.
Fix Cropped Prints Step by Step
Select the Printer You Will Use
Select the actual printer and check whether its status is Ready, Printing, Paused, Unavailable, or Unknown. Choose the paper before finalizing the layout. A different printer, borderless paper preset, or custom paper size can report a different printable area and can change the page grid.
The menu includes additional paper formats reported by the printer. Unsupported presets and Custom remain selectable under More. Before printing, check any warning about paper size or orientation mismatches and content or crop marks outside the printable area; return to adjust settings or confirm printing anyway.
Set Margin to Auto
Auto is the best first choice for preserving the complete image. Check the Output summary to confirm that Margin is enabled and review any orange safe-area warning before printing.
Use 5 mm When You Need a Manual Value
If Auto is unavailable, begin with 5 mm on every edge. Custom per-edge controls are useful when a printer consistently clips one side more than the others.
Add Overlap Only for Page Assembly
For a multi-page poster, 5 mm overlap is a practical starting point. It repeats content across internal page boundaries, giving you room to trim and align the sheets. It does not replace a safe margin.
Load Flat Paper Squarely
Use one paper type and batch. Tap the stack square, remove curled sheets, load the printable side and orientation correctly, and place the paper guides snugly against the edges without pinching them.
Match the macOS Print Dialog
Choose the same paper size and orientation used in PrintTiler. Use 100% or Actual Size when available, and turn off Scale to Fit or other driver scaling that would resize the prepared tiles.
Margin vs. Overlap: They Solve Different Problems
Margin
Protects sheet edges
Margin moves the usable layout inside the area the printer can reach. Increase it when the outside perimeter of a page is missing.
Overlap
Protects internal seams
Overlap repeats a strip of image on neighboring pages. Increase it when you need more tolerance for trimming and aligning a tiled print.
Margin + Overlap
Best for tiled home printing
Use Auto Margin to preserve the full page content, then add 5 mm overlap when the sheets will be assembled into a poster, map, pattern, or technical drawing.
For more assembly detail, read How to Use Margins and Overlap for Tiled Printing and How to Assemble Tiled Prints with Perfect Alignment.
Borderless Printing Can Crop by Design
Many borderless modes avoid white edges by enlarging the image beyond the paper and printing past its boundary. This is called overscan. The result looks edge-to-edge, but some outer pixels are intentionally discarded. That behavior comes from the printer driver, so Auto Margin cannot make a borderless preset both edge-to-edge and perfectly uncropped.
Choose the Result You Need
For exact dimensions and complete content, use the standard A4, Letter, or other paper option with Auto Margin. For edge-to-edge ink, keep text and essential details inside a safe zone and extend non-essential background artwork beyond the final edge as bleed.
Test Before Printing Every Page
A printer driver has the final say over what reaches the sheet. Before using a full stack of paper and ink, print two neighboring tiles that include an outside corner, then assemble their shared seam.
- The complete outside edge is visible inside the paper.
- Text, labels, faces, and cut lines do not enter the non-printable area.
- The paper size and orientation match PrintTiler.
- The sheets are flat and squared in the tray, with the paper guides set correctly.
- The print dialog is not applying Scale to Fit or another resize operation.
- Internal seams contain enough repeated content to trim and align.
- The two test pages feed consistently without a noticeable angle or random shift.
If only the outside is missing, increase Margin. If an internal join is difficult to align, increase Overlap. If the entire output has changed size, check paper and scaling settings before changing either. If the pages are angled or move inconsistently, correct the loading or feed problem before the full print run.
If the problem is a measurable size difference rather than missing edges, use thewrong-size print diagnosis, theprinter size calibration, or theexact-size printing workflow to compare horizontal and vertical measurements and isolate driver scaling from printer mechanics.
Frequently Asked Questions
Why is my printer cutting off the edges of an image?
Most printers have a non-printable area near each paper edge. Content placed inside that area is clipped by the printer. Borderless mode can also enlarge the page slightly and crop its outer pixels.
What is the difference between Auto Margin and Overlap?
Auto Margin keeps content inside the printer's reported safe area on every sheet. Overlap duplicates image content across neighboring tiles so the sheets can be trimmed and aligned. Margin protects paper edges; overlap protects seams.
Can I print borderless without cropping the image?
Many borderless printer modes use overscan, which intentionally enlarges and crops the image. For exact dimensions, use the standard paper option with Auto Margin. If edge-to-edge ink is essential, add bleed and keep important content away from the outer edge.
What should I use if Auto Margin is unavailable?
Start with a 5 mm margin on all four sides. Print a test page that includes an outer edge, then increase any side that is still clipped.
Why did adding a margin increase the number of pages?
A margin reduces the printable width and height of each sheet. The full-size artwork may therefore need an additional row or column of pages. This preserves the intended content instead of placing it in a region the printer cannot reach.
Why do neighboring pages still not align at 100% scale?
A home printer can shift or skew curled or unevenly loaded paper. Square flat sheets in the tray, set the guides snugly, keep the paper consistent, and test two adjacent pages. Use 5 mm overlap for small assembly adjustments, but correct severe or random feed errors before printing the full job.
What happens to Auto Margin if the selected printer is unavailable?
PrintTiler keeps the last successfully reported safe area for that printer, paper size, and orientation. If there is no matching cached value, it uses a conservative 5 mm fallback until live printer information is available again.
Where are unsupported paper sizes and Custom in PrintTiler?
In PrintTiler 1.12.1, unsupported presets and Custom are under More in the paper menu and remain selectable. Prefer the paper actually supported and loaded in the destination printer. Before printing, review any warning about mismatched paper dimensions, orientation, or content outside the printable area.
Keep the Full Image, Then Assemble the Pages
The reliable setup is straightforward: select the real printer and paper, use Auto Margin, add overlap only when the pages need to be joined, and avoid scaling the job a second time. That protects the complete image while still giving tiled pages enough shared content for clean assembly.